Saturday, 25 June 2011

Quick update

Hope the dough bugs are going well !
Next week will be rock buns for teddies tea parties.
I'll post it on Tuesday...see you then.
Heli x

Wednesday, 22 June 2011

Dough Bugs !

Hello again.   I've been experimenting with food dye for this week's activity so I am typing now with bright blue fingers. Very fetching.
Oh well...such is a mother's lot!
This week we're going to make something more adventurous.


Salt dough!

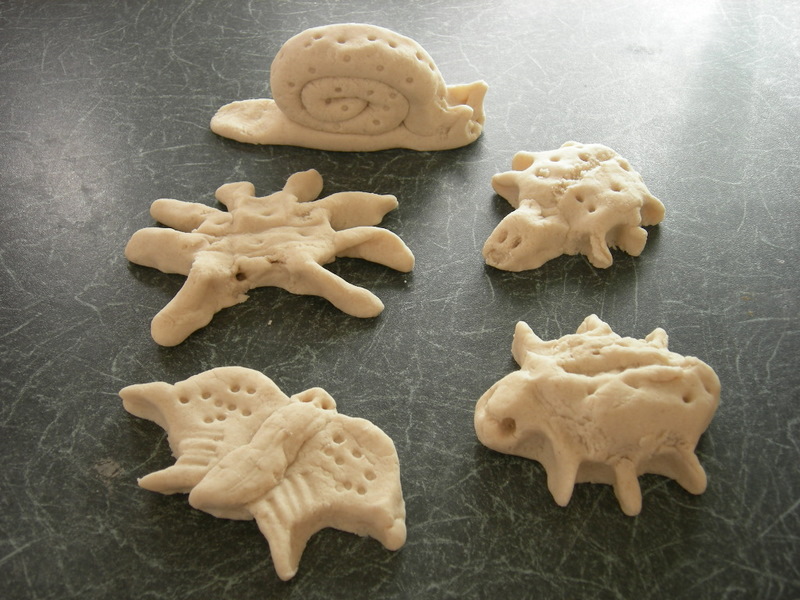
Salt dough bugs and beetles to go with our flowers and garden pictures.  This will produce bug models and provide cheap play dough for the days ahead.  It's been raining endlessly here so it's been fun doing these in the kitchen with the radio on, waiting for the sun to return. (Some of us have started to forget what it looks like!) Anyway, this is a good one for a rainy day.

This is a very simple recipe.  There are several more complex methods, but this one is the easiest and always works.  You may want, or need , to spread this over several days.  One day to make and bake the bugs, another day to paint them and another day to play with the play dough. (It will keep very happily in the fridge for a week.)

This is what we're aiming for....


This is what you will need....


A small cup for measuring. It doesn't matter what size, as long as you use the same cup for measuring everything.
3 cups of plain flour.  Nothing fancy, just the ordinary flour from your cupboard .
1 cup of table salt.
1 cup of cold water.
Mixing bowl.
Spoon for mixing ... then hands.
Lollipopsticks, pastry cutters, rolling pin, ...anything to make shapes and marks. I find a wooden chopstick is the most useful thing .
2 dessert spoons of vegetable oil.
Edible food colouring or flavouring to add scent to the dough.
Plastic box.
Poster paint, same as last week.
Paint brush.
Baking tray or oven/ microwave proof dish.
Wire cooling rack, if you have such a luxury.

Here's what to do....

1.   Using the cup, measure 3 cups of flour, 1 cup of salt and 1 cup of cold water into a mixing bowl.


2.   Stir up with a spoon or knife then use hands to make the dough into a ball.

3.   Put half of the dough to one side. This is for the bugs.

4.   Still in the bowl knead (squish and squash) the other half of the dough with 2 spoons of veggie oil and 2 teaspoons of food colouring.  This makes coloured  play dough.
You can add a flavouring like mint to give the play dough a fun smell when the children play with it. (Worryingly, my two like the smell of alcohol free rum flavouring.... mmmm!)


5.   Put the coloured dough in the fridge in a plastic bag or plastic box.  It will keep for at least a week in the fridge.


6.   Now return to the plain dough. Knead the dough well then break into 4-6 pieces. Not too small.  

7.   Make each piece into a different bug.
Snails are the easiest .... roll out a long sausage of dough then curl it round to make a shell shape.
Butterflies need to be cut out of flattened dough.
Beetles have six legs and spiders have eight.  (We checked, in the garden, hopefully without killing too many bugs !)
Tease the dough into legs and heads rather than sticking separate bits on. Bolt on bits drop off when cooked.


8.   Now the tricky bit......The dough must dry out. Only grown-ups go near the cooker or microwave.
The thicker the dough the longer it takes.
In the oven on a lightly greased tray, for 1 hour at only 100 C, gas mark 1/4, 225 F.
OR microwave on low for ten minutes, then 3-4 on medium.
(Cook for longer if thicker. Stop cooking if it bubbles.)

9. Leave to cool completely.

10. Paint your bug with lovely bright colours.  Watch out for the black getting everywhere.  Leave to dry


All done and well done !


The children can do all of this except the cooking part...safety first.

Aprons are a great help. My mum bought the kids two little aprons that they wore for everything. A brilliant granny gift !

Helpful hint.... Whilst the bugs are and cooking/cooling the children can "help" wash up, then play with the dough from the fridge.  Don't bake it. Pop it back in the fridge afterwards to play with another day.
My daughter has just finished a rather expert tortoise, but then she's twelve and much more artistic than her mum.....apparently!  You'll probably find that you can't resist having a go. I have made dough flowers and baskets and allsorts in the past.  It's really relaxing, so why not ?

All that remains is to display your bugs on the windowsill or perhaps with some lollistick flowers.  Really handsome bugs could be wrapped in tissue and given as homemade presents to unsuspecting relatives..

See you next week for more fun.  Do send a comment or share what you have made.

Heli x


Tuesday, 14 June 2011

My Garden Picture.

Here we are.... Week 2 !

Hello to everyone who has logged on around the world...Germany, Taiwan, Britain and the States so far.
I hope you and your little ones are ready for something a little bit messier this week.

Paint !

Don't panic....it's not too messy but I would suggest having a bowl or sink full of warm water and a hand towel standing by before you start.  I learnt this the hard way. Children nearly always wait to get truly painty until the point when we've got our hands full with their wet painting, their teddy that wants to see the painting and their brother or sister who tried to eat the painting.  Have the hand washing water ready first, trust me. Actually, the more you can get ready in advance the better. It's so much easier to pop a few things together when they're asleep or watching cartoons. (You'll feel much more on top of things.)
Todays message...Messiness is good , but so is soap and water !

Here we go then. This week we are going to make a picture of a garden with nearly 3-d plants and bugs. Why not take the children for a walk in the park or around your garden first to look at the plants and bugs in real life. (Watch out for the ones that bite or sting !) Once again this is a cheapy creation. I have used children's paint which we already had at home but if you don't have any you could use pencils, crayons or scraps of coloured paper instead.


This is what we're aiming for....


Here's what you will need....


One cardboard box, mine had cornflakes in it.
Pencil
Lollipop sticks
Supervised scissors
Children's glue
Washable paint, green, blue and any other spare colours. (Avoid black unless you supervise it carefully or pictures can be spoilt very easily.)
Paint brushes, large ends are better for this.
Optional glitter.

Here's how to do it....

1.   Cut up the cereal box . You need the two large sides of the box to paint on and the remaining scraps for making flowers and bugs.  The inside of cereal packets are great for kids paintings because they are stronger than paper when wet.


2.   Paint one cardboard sheet blue for sky. All over. Leave to dry. (Use the inside surface not the printed side)

3.    On the other sheet make green hand prints. This will be the grass. If your child is nervous of putting their hand into green gooey paint (and what sensible person wouldn't be) then they can paint their hand green with the brush to make the hand prints. Leave to dry.


4.   On the left over scraps, paint bugs, beetles and flowers. Leave to dry, then cut out. (If a grown up curls the edges slightly before drying they will be more 3-dimensional.)

5.   Cut out the green grass hand prints. Supervise the scissors.

6.   Using the glue, stick the grass at the bottom of the blue sky. It can overlap.

7.    Stick 2 or more bugs onto the end of lollipop sticks. To make puppets.

8.   Stick the rest of the bugs and flowers onto the grass and sky.

9.   Use a little glitter on the wet paint to add that special sparkle.

10.   Display proudly, perhaps with a pot of lollipop flowers either side !


All done and well done !

The bug puppets can then pop in and out of the grass or flutter across the sky. 


My big children have loved doing this again. They make much more detailed bugs now but still love the hand painting. It's a great activity to do if you have a mixture of younger and older children. 
The only thing you may have to buy is paint. Everything else is lying around around at home. If you do buy paint, just get cheap and cheerful washable poster paint. Don't bother with black but white is very handy when you want to start mixing colours. 
Top tip... if you add a dash of water and a tiny squirt of washing up liquid when you stir up the paint, it goes a lot further and is much more washable afterwards. 

Do send me your pictures and comments. I'll try to get my head around the technology to make a gallery.

Happy painting ! Tune in again for another arty idea.  Next time... dough bugs !
See you next week,
Heli x


Saturday, 4 June 2011

Indoor flower pots

So, here goes the first week's activity. Should have been earlier in the week but how silly was I to try to start a new project during half term holiday.  As I type, my two children are sitting in the paddling pool throwing buckets of water and rubber ducks at each other, while I snatch a few moments. They're nearly teenagers now and I hope they ever grow out of it ! 
My message to the world today.... don't let your kids grow up too quickly !

Right .... to business.....the first few ideas are all to do with gardens.
This week it's indoor flower pots. You can make them on a rainy day in the kitchen or outside in the sun if you're lucky.  Whether you live in the country or in a city apartment  you and your little ones can make window box flowers for next to nothing.

This is what we're aiming for....


Here's what you will need.....


Lollisticks,
Empty yoghurt pot or some other delicious pudding pot,
Paper or card, (I've recycled an old file divider),
Felt pens, or pencils,
White childrens glue,
Scraps to decorate (anything pretty that's going spare....shapes cut from old wrapping paper, sweety wrappers, tissue paper, crayons, glitter etc)
Supervised scissors.

How to do it......

1.  Draw large flower shapes on the paper and cut them out.  Draw them about the same size as the pot you'll put them in, (draw round the pot, even.)

2.  Decorate one side of the flower head with the pens and pretty bits. This is the arty bit. Let yourself go!  Lollisticks make good glue spreaders.

3.  Stick each flower onto a lollistick.  This can be the tricky bit.  It helps if you stick a bit of spare paper over the back of the stick, after you've stuck the stick flat side down on the back of the flower.  Don't move it until it's dry.  (if your flower is very heavily decorated you may need to use two sticks.)

4.  Stand the flowers in the yoghurt pot. (or in my case, the tesco chocolate mousse pot, yum!)  Yes... the pot now falls over....so this is the clever bit. The grown-up takes the pot to the kitchen and makes a slit in the base of the pot with a sharp knife, just wide enough for the lollistick to pop through.  Now turn the pot upside down and shove the flower stalks in to the holes. It's upside down but it should stand up.

5.  Alternatively.....if you have a real garden you can fill a plant pot with soil or stones to plant your lolli-flowers. You can also fill your yoghurt pot with rice to do the same thing, but it always spills!

6. Display pots with pride.


All done and well done!

Try to let your little ones do as much of this for themselves as possible. If you get the urge to be arty yourself, then make your own . Although, obviously, your children's will be best!! 
All of these materials were scavenged from around the house with NO expense. If you must buy anything, buy childrens white glue. Smiths sell it and most art shops and many cornershops.

There we are then, and I only had to pause to untangle my own children twice!

Next week, another garden idea....tune in again.
(Thanks to husband for showing me how to load photos....blog skills coming on steadily!)

regards

Heli x