How exciting.....the blog has now reached Ireland, Uganda and South Korea . Hello and welcome!
This week will be making "Me Trees". Nice and messy, so I'm waiting for the kids to come home from school to help me with this one. Standby with string , paint, paper and a paper plate if you've got one. (don't worry if not).
All will be revealed......
regards Heli x
Tuesday, 19 July 2011


Wednesday, 13 July 2011
Paper Cup Castles
Hello everyone,
This week we'll do a really simple make. These cup castles are cheap and easy and don't require too much adult supervision. Except with the scissors of course.
First of all, a word about scissors.
This is a tricky one and as an infant teacher I have been all around the houses about this.
Most scissors that are designed for small children don't cut properly. The manufacturers, in their wisdom, have decided that the only safe scissor is a non-cutting scissor ! Actually, I have seen children hurt their hands by struggling with the tiny handles against whatever their trying to cut.
It's better to have slightly more grown-up scissors but supervise them more closely. I never allow scissors in bedrooms or in a room without an adult popping in and out.
Blunt-nosed or rounded ends scissors are good for little ones but make sure there is room for them to get their fingers in the handles. They should be sharp enough to cut paper easily and card carefully. It is safer to have properly working scissors than allow children to become cross at frustratingly blunt ones. My kids and my pupils have always used well supervised junior scissors not infant ones.
Many parents won't allow little ones to use scissors and you'd be amazed how may children come into their first class at school unable to cut.
It drives the kids mad.....better to train them to use them safely.
Don't forget that nowadays you can buy "left handed" scissors and even "either hand" scissors. It is also possible to get scissors with special handles for children who need extra help gripping things.(These are more specialized but you can get them online.)
Shop around to get good ones... it's worth it. And at the end of the day, put the scissors away, out of reach !
OK, I'm done...you may have noticed.... scissors are touchy subject !!
So, Paper cup castles. They're very quick and easy so you can makes lots of them. They're great to use with little toy people, lego men, plastic animals, toy soldiers and so on.
This is what we're aiming for ....


This is what you'll need ....

Paper cups. Not plastic because the glue and the felt tips won't work so well. Plain paper cups are best, but you can use recycled paper cups after you've been out for a coffee !
Supervised scissors
Glue or sticky tape
lollipop sticks
Felt tip pens or crayons or pencils
Scraps of coloured paper or sticky coloured shapes. Maybe little stickers.
Here's what to do ....
1. Prepare your paper cup.....rinse out the coffee (or black tea in my case), cover it in plain paper if you want to hide any logos or pictures. If you don't have cups, it can be done with cardboard tubes, cut into a range of lengths.
2. Supervise the scissors to cut a door or two. Measure the height of the door against your toy people. Cut up one side and across the top to leave a door flap.
3. Decorate the castle with felt tips or pencils.
4. You can cut shapes out of coloured paper to stick on as flowers or simply as pretty colours.
5. Make a small cut in the top of the castle (base of the cup) and shove a lollipop stick through to become a flagpole.
6. Wrap the ends of a strip of paper around the top of the stick to make a flag.
7. Add some more castles and small toys to make a whole village to play with.


The children can then decorate as many cups as you can give them. This is a lovely activity to do with other little friends and they can be made as fancy as you like. You can add ribbons to the flag pole and add shiny stickers for princess castles or draw on dragons to battle with knights ! You can get cardboard trays from supermarmarkets (trays for catfood tins or coffee jars etc) just ask customer services. By putting the cups inside tray it becomes castle walls or village fences . Note the doghouse ! Decorate madly !
When the castles have been played with they can be easily stacked up and kept for to next time without taking up too much storage space.....which always helps.
Great fun ! See you next week.
Regards
Heli x
This week we'll do a really simple make. These cup castles are cheap and easy and don't require too much adult supervision. Except with the scissors of course.
First of all, a word about scissors.
This is a tricky one and as an infant teacher I have been all around the houses about this.
Most scissors that are designed for small children don't cut properly. The manufacturers, in their wisdom, have decided that the only safe scissor is a non-cutting scissor ! Actually, I have seen children hurt their hands by struggling with the tiny handles against whatever their trying to cut.
It's better to have slightly more grown-up scissors but supervise them more closely. I never allow scissors in bedrooms or in a room without an adult popping in and out.
Blunt-nosed or rounded ends scissors are good for little ones but make sure there is room for them to get their fingers in the handles. They should be sharp enough to cut paper easily and card carefully. It is safer to have properly working scissors than allow children to become cross at frustratingly blunt ones. My kids and my pupils have always used well supervised junior scissors not infant ones.
Many parents won't allow little ones to use scissors and you'd be amazed how may children come into their first class at school unable to cut.
It drives the kids mad.....better to train them to use them safely.
Don't forget that nowadays you can buy "left handed" scissors and even "either hand" scissors. It is also possible to get scissors with special handles for children who need extra help gripping things.(These are more specialized but you can get them online.)
Shop around to get good ones... it's worth it. And at the end of the day, put the scissors away, out of reach !
OK, I'm done...you may have noticed.... scissors are touchy subject !!
So, Paper cup castles. They're very quick and easy so you can makes lots of them. They're great to use with little toy people, lego men, plastic animals, toy soldiers and so on.
This is what we're aiming for ....


This is what you'll need ....

Paper cups. Not plastic because the glue and the felt tips won't work so well. Plain paper cups are best, but you can use recycled paper cups after you've been out for a coffee !
Supervised scissors
Glue or sticky tape
lollipop sticks
Felt tip pens or crayons or pencils
Scraps of coloured paper or sticky coloured shapes. Maybe little stickers.
Here's what to do ....
1. Prepare your paper cup.....rinse out the coffee (or black tea in my case), cover it in plain paper if you want to hide any logos or pictures. If you don't have cups, it can be done with cardboard tubes, cut into a range of lengths.
2. Supervise the scissors to cut a door or two. Measure the height of the door against your toy people. Cut up one side and across the top to leave a door flap.
3. Decorate the castle with felt tips or pencils.
4. You can cut shapes out of coloured paper to stick on as flowers or simply as pretty colours.
5. Make a small cut in the top of the castle (base of the cup) and shove a lollipop stick through to become a flagpole.
6. Wrap the ends of a strip of paper around the top of the stick to make a flag.
7. Add some more castles and small toys to make a whole village to play with.


All's done and well done !!
The children can then decorate as many cups as you can give them. This is a lovely activity to do with other little friends and they can be made as fancy as you like. You can add ribbons to the flag pole and add shiny stickers for princess castles or draw on dragons to battle with knights ! You can get cardboard trays from supermarmarkets (trays for catfood tins or coffee jars etc) just ask customer services. By putting the cups inside tray it becomes castle walls or village fences . Note the doghouse ! Decorate madly !
When the castles have been played with they can be easily stacked up and kept for to next time without taking up too much storage space.....which always helps.
Great fun ! See you next week.
Regards
Heli x
Tuesday, 5 July 2011
Rock Buns!
Hello again
Nearly all technical difficulties have been overcome. I downloaded a great new photo handling program but it's taken me a short while to get to grips with it. It's great to learn new skills!
So, Straight to business!
I love making things with the children that we can all eat. We often had these with a teddy or two at our picnics. It's lovely to wrap a couple of warm rock buns in a cloth, grab a bottle of drink and nip down to the park for an impromptu picnic. You could picnic in your own garden, on your balcony or even in your front room on a blanket with your home made flowers and bugs. The buns are a simple cheap recipe and your little ones can do almost all of it with a little help....and they can get their hands gooey !
Message to the world- Edible mess is the best possible mess!!
First of all- hand washing. A little bit of health and safety, and it makes the buns more edible afterwards!
Preheat the oven 190C, 374 F or gas mark 5- grown-ups only
This is what we're aiming for....

Here's what you will need....
8oz, 225g flour
4oz, 112g butter or margarine
3oz, 85g sugar (brown if you have it)
1 large eating apple
Grated rind of 1 orange
1 egg
1 tablespoon milk
Greased baking tray
Bowl
Cup
Tablespoon
Here's how to do it....
1. Grease the baking tray with a little bit of the margarine. The children can do this with their fingers.
2. Mix the flour, sugar and the margarine in the bowl. Rub the margarine into the flour to make it in breadcrumbs- use finger tips to get the best results.
3. Chop the apple and put it with the orange rind and the sugar in the bowl with the flour mixture
4. In a cup briskly mix the egg and milk together
5. Pour the egg/milk into the mixture and mix it with your clean hands to make a dough
6. Drop small handfuls of the dough onto the baking sheets in little mountains. If the mountains are too big, the middle won't cook properly.
7. Sprinkle with sugar and bake for about 15 minutes.

ALLOW TO COOL- the apple gets very hot
You can make these with any other dry fruits such as glace cherries or raisins. It's best with self raising flour but I have been known to do it with plain flour and the buns were still pretty edible !
These little buns can be popped in the freezer for up to three months
Serve for tea with teddies or keep in a box for tomorrow. I tell you what, why not go mad and have an adventure..... Pop a couple of buns in a bag and hop on a bus to a different park. We love pop and hop adventures. When children are little bus rides are a very big deal. Strangely it's the kids who travel everywhere by car who find it the most exciting. You don't need to go anywhere special but they'll love it and it gets you out of the house too. And every stay at home parent or grandparent needs that as much as the little ones. So, pop and hop !
See you next week for paper cup castles.....invented by Grandad !
Heli x
Nearly all technical difficulties have been overcome. I downloaded a great new photo handling program but it's taken me a short while to get to grips with it. It's great to learn new skills!
So, Straight to business!
I love making things with the children that we can all eat. We often had these with a teddy or two at our picnics. It's lovely to wrap a couple of warm rock buns in a cloth, grab a bottle of drink and nip down to the park for an impromptu picnic. You could picnic in your own garden, on your balcony or even in your front room on a blanket with your home made flowers and bugs. The buns are a simple cheap recipe and your little ones can do almost all of it with a little help....and they can get their hands gooey !
Message to the world- Edible mess is the best possible mess!!
First of all- hand washing. A little bit of health and safety, and it makes the buns more edible afterwards!
Preheat the oven 190C, 374 F or gas mark 5- grown-ups only
This is what we're aiming for....

Here's what you will need....
8oz, 225g flour
4oz, 112g butter or margarine
3oz, 85g sugar (brown if you have it)
1 large eating apple
Grated rind of 1 orange
1 egg
1 tablespoon milk
Greased baking tray
Bowl
Cup
Tablespoon
Here's how to do it....
1. Grease the baking tray with a little bit of the margarine. The children can do this with their fingers.
2. Mix the flour, sugar and the margarine in the bowl. Rub the margarine into the flour to make it in breadcrumbs- use finger tips to get the best results.
3. Chop the apple and put it with the orange rind and the sugar in the bowl with the flour mixture
4. In a cup briskly mix the egg and milk together
5. Pour the egg/milk into the mixture and mix it with your clean hands to make a dough
6. Drop small handfuls of the dough onto the baking sheets in little mountains. If the mountains are too big, the middle won't cook properly.
7. Sprinkle with sugar and bake for about 15 minutes.

All done and well done !
ALLOW TO COOL- the apple gets very hot
You can make these with any other dry fruits such as glace cherries or raisins. It's best with self raising flour but I have been known to do it with plain flour and the buns were still pretty edible !
These little buns can be popped in the freezer for up to three months
Serve for tea with teddies or keep in a box for tomorrow. I tell you what, why not go mad and have an adventure..... Pop a couple of buns in a bag and hop on a bus to a different park. We love pop and hop adventures. When children are little bus rides are a very big deal. Strangely it's the kids who travel everywhere by car who find it the most exciting. You don't need to go anywhere special but they'll love it and it gets you out of the house too. And every stay at home parent or grandparent needs that as much as the little ones. So, pop and hop !
See you next week for paper cup castles.....invented by Grandad !
Heli x
Thursday, 30 June 2011
Arggh!!
Arggh!! technical hitches on machine and inadequate skills in human !
Rock buns will be next tuesday, by which time all will be graceful and smooth perfection.
Yeah right ! But I will battle on.
If you're thinking, "Hang on a minute... what am I supposed to do with the kids now?"
I recommend my favourite standby.
" Hello darling, did you know it's teddy's birthday today ?"
"Really mama ?"
"Absolutely....lets make him a card and celebrate at tea time."
"Hoooray, I'll get teddy !"
Never fails.
(unlike technology!)
see you on tuesday
Heli xx
Rock buns will be next tuesday, by which time all will be graceful and smooth perfection.
Yeah right ! But I will battle on.
If you're thinking, "Hang on a minute... what am I supposed to do with the kids now?"
I recommend my favourite standby.
" Hello darling, did you know it's teddy's birthday today ?"
"Really mama ?"
"Absolutely....lets make him a card and celebrate at tea time."
"Hoooray, I'll get teddy !"
Never fails.
(unlike technology!)
see you on tuesday
Heli xx
Saturday, 25 June 2011
Quick update
Hope the dough bugs are going well !
Next week will be rock buns for teddies tea parties.
I'll post it on Tuesday...see you then.
Heli x
Next week will be rock buns for teddies tea parties.
I'll post it on Tuesday...see you then.
Heli x
Wednesday, 22 June 2011
Dough Bugs !
Hello again. I've been experimenting with food dye for this week's activity so I am typing now with bright blue fingers. Very fetching.
Oh well...such is a mother's lot!
This week we're going to make something more adventurous.
Salt dough!
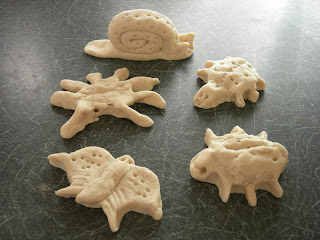
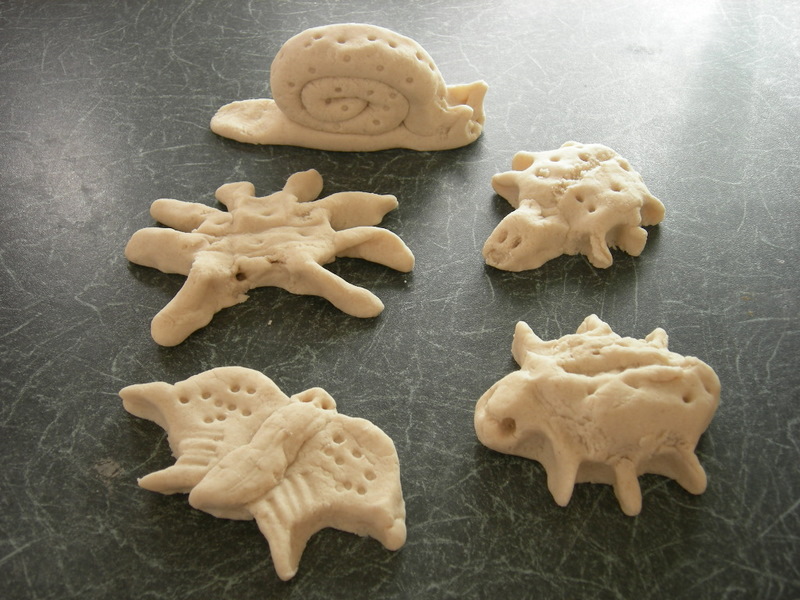
Salt dough bugs and beetles to go with our flowers and garden pictures. This will produce bug models and provide cheap play dough for the days ahead. It's been raining endlessly here so it's been fun doing these in the kitchen with the radio on, waiting for the sun to return. (Some of us have started to forget what it looks like!) Anyway, this is a good one for a rainy day.
This is a very simple recipe. There are several more complex methods, but this one is the easiest and always works. You may want, or need , to spread this over several days. One day to make and bake the bugs, another day to paint them and another day to play with the play dough. (It will keep very happily in the fridge for a week.)
This is what we're aiming for....

This is what you will need....

A small cup for measuring. It doesn't matter what size, as long as you use the same cup for measuring everything.
3 cups of plain flour. Nothing fancy, just the ordinary flour from your cupboard .
1 cup of table salt.
1 cup of cold water.
Mixing bowl.
Spoon for mixing ... then hands.
Lollipopsticks, pastry cutters, rolling pin, ...anything to make shapes and marks. I find a wooden chopstick is the most useful thing .
2 dessert spoons of vegetable oil.
Edible food colouring or flavouring to add scent to the dough.
Plastic box.
Poster paint, same as last week.
Paint brush.
Baking tray or oven/ microwave proof dish.
Wire cooling rack, if you have such a luxury.
Here's what to do....
1. Using the cup, measure 3 cups of flour, 1 cup of salt and 1 cup of cold water into a mixing bowl.

2. Stir up with a spoon or knife then use hands to make the dough into a ball.
3. Put half of the dough to one side. This is for the bugs.
4. Still in the bowl knead (squish and squash) the other half of the dough with 2 spoons of veggie oil and 2 teaspoons of food colouring. This makes coloured play dough.
You can add a flavouring like mint to give the play dough a fun smell when the children play with it. (Worryingly, my two like the smell of alcohol free rum flavouring.... mmmm!)

5. Put the coloured dough in the fridge in a plastic bag or plastic box. It will keep for at least a week in the fridge.
6. Now return to the plain dough. Knead the dough well then break into 4-6 pieces. Not too small.
7. Make each piece into a different bug.
Snails are the easiest .... roll out a long sausage of dough then curl it round to make a shell shape.
Butterflies need to be cut out of flattened dough.
Beetles have six legs and spiders have eight. (We checked, in the garden, hopefully without killing too many bugs !)
Tease the dough into legs and heads rather than sticking separate bits on. Bolt on bits drop off when cooked.
8. Now the tricky bit......The dough must dry out. Only grown-ups go near the cooker or microwave.
The thicker the dough the longer it takes.
In the oven on a lightly greased tray, for 1 hour at only 100 C, gas mark 1/4, 225 F.
OR microwave on low for ten minutes, then 3-4 on medium.
(Cook for longer if thicker. Stop cooking if it bubbles.)
Oh well...such is a mother's lot!
This week we're going to make something more adventurous.
Salt dough!
Salt dough bugs and beetles to go with our flowers and garden pictures. This will produce bug models and provide cheap play dough for the days ahead. It's been raining endlessly here so it's been fun doing these in the kitchen with the radio on, waiting for the sun to return. (Some of us have started to forget what it looks like!) Anyway, this is a good one for a rainy day.
This is a very simple recipe. There are several more complex methods, but this one is the easiest and always works. You may want, or need , to spread this over several days. One day to make and bake the bugs, another day to paint them and another day to play with the play dough. (It will keep very happily in the fridge for a week.)
This is what we're aiming for....

This is what you will need....

A small cup for measuring. It doesn't matter what size, as long as you use the same cup for measuring everything.
3 cups of plain flour. Nothing fancy, just the ordinary flour from your cupboard .
1 cup of table salt.
1 cup of cold water.
Mixing bowl.
Spoon for mixing ... then hands.
Lollipopsticks, pastry cutters, rolling pin, ...anything to make shapes and marks. I find a wooden chopstick is the most useful thing .
2 dessert spoons of vegetable oil.
Edible food colouring or flavouring to add scent to the dough.
Plastic box.
Poster paint, same as last week.
Paint brush.
Baking tray or oven/ microwave proof dish.
Wire cooling rack, if you have such a luxury.
Here's what to do....
1. Using the cup, measure 3 cups of flour, 1 cup of salt and 1 cup of cold water into a mixing bowl.

2. Stir up with a spoon or knife then use hands to make the dough into a ball.
3. Put half of the dough to one side. This is for the bugs.
4. Still in the bowl knead (squish and squash) the other half of the dough with 2 spoons of veggie oil and 2 teaspoons of food colouring. This makes coloured play dough.
You can add a flavouring like mint to give the play dough a fun smell when the children play with it. (Worryingly, my two like the smell of alcohol free rum flavouring.... mmmm!)

5. Put the coloured dough in the fridge in a plastic bag or plastic box. It will keep for at least a week in the fridge.
6. Now return to the plain dough. Knead the dough well then break into 4-6 pieces. Not too small.
7. Make each piece into a different bug.
Snails are the easiest .... roll out a long sausage of dough then curl it round to make a shell shape.
Butterflies need to be cut out of flattened dough.
Beetles have six legs and spiders have eight. (We checked, in the garden, hopefully without killing too many bugs !)
Tease the dough into legs and heads rather than sticking separate bits on. Bolt on bits drop off when cooked.
8. Now the tricky bit......The dough must dry out. Only grown-ups go near the cooker or microwave.
The thicker the dough the longer it takes.
In the oven on a lightly greased tray, for 1 hour at only 100 C, gas mark 1/4, 225 F.
OR microwave on low for ten minutes, then 3-4 on medium.
(Cook for longer if thicker. Stop cooking if it bubbles.)
9. Leave to cool completely.
10. Paint your bug with lovely bright colours. Watch out for the black getting everywhere. Leave to dry

The children can do all of this except the cooking part...safety first.
Aprons are a great help. My mum bought the kids two little aprons that they wore for everything. A brilliant granny gift !
Helpful hint.... Whilst the bugs are and cooking/cooling the children can "help" wash up, then play with the dough from the fridge. Don't bake it. Pop it back in the fridge afterwards to play with another day.
My daughter has just finished a rather expert tortoise, but then she's twelve and much more artistic than her mum.....apparently! You'll probably find that you can't resist having a go. I have made dough flowers and baskets and allsorts in the past. It's really relaxing, so why not ?
All that remains is to display your bugs on the windowsill or perhaps with some lollistick flowers. Really handsome bugs could be wrapped in tissue and given as homemade presents to unsuspecting relatives..
See you next week for more fun. Do send a comment or share what you have made.
Heli x

All done and well done !
The children can do all of this except the cooking part...safety first.
Aprons are a great help. My mum bought the kids two little aprons that they wore for everything. A brilliant granny gift !
Helpful hint.... Whilst the bugs are and cooking/cooling the children can "help" wash up, then play with the dough from the fridge. Don't bake it. Pop it back in the fridge afterwards to play with another day.
My daughter has just finished a rather expert tortoise, but then she's twelve and much more artistic than her mum.....apparently! You'll probably find that you can't resist having a go. I have made dough flowers and baskets and allsorts in the past. It's really relaxing, so why not ?
All that remains is to display your bugs on the windowsill or perhaps with some lollistick flowers. Really handsome bugs could be wrapped in tissue and given as homemade presents to unsuspecting relatives..
See you next week for more fun. Do send a comment or share what you have made.
Heli x
Tuesday, 14 June 2011
My Garden Picture.
Here we are.... Week 2 !
Hello to everyone who has logged on around the world...Germany, Taiwan, Britain and the States so far.
I hope you and your little ones are ready for something a little bit messier this week.
Paint !
Don't panic....it's not too messy but I would suggest having a bowl or sink full of warm water and a hand towel standing by before you start. I learnt this the hard way. Children nearly always wait to get truly painty until the point when we've got our hands full with their wet painting, their teddy that wants to see the painting and their brother or sister who tried to eat the painting. Have the hand washing water ready first, trust me. Actually, the more you can get ready in advance the better. It's so much easier to pop a few things together when they're asleep or watching cartoons. (You'll feel much more on top of things.)
Todays message...Messiness is good , but so is soap and water !
Here we go then. This week we are going to make a picture of a garden with nearly 3-d plants and bugs. Why not take the children for a walk in the park or around your garden first to look at the plants and bugs in real life. (Watch out for the ones that bite or sting !) Once again this is a cheapy creation. I have used children's paint which we already had at home but if you don't have any you could use pencils, crayons or scraps of coloured paper instead.
This is what we're aiming for....

Here's what you will need....
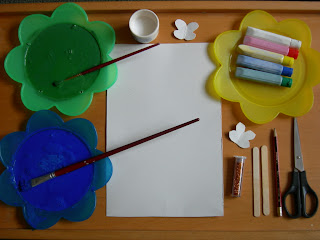
One cardboard box, mine had cornflakes in it.
Pencil
Lollipop sticks
Supervised scissors
Children's glue
Washable paint, green, blue and any other spare colours. (Avoid black unless you supervise it carefully or pictures can be spoilt very easily.)
Paint brushes, large ends are better for this.
Optional glitter.
Here's how to do it....
1. Cut up the cereal box . You need the two large sides of the box to paint on and the remaining scraps for making flowers and bugs. The inside of cereal packets are great for kids paintings because they are stronger than paper when wet.

2. Paint one cardboard sheet blue for sky. All over. Leave to dry. (Use the inside surface not the printed side)
3. On the other sheet make green hand prints. This will be the grass. If your child is nervous of putting their hand into green gooey paint (and what sensible person wouldn't be) then they can paint their hand green with the brush to make the hand prints. Leave to dry.

4. On the left over scraps, paint bugs, beetles and flowers. Leave to dry, then cut out. (If a grown up curls the edges slightly before drying they will be more 3-dimensional.)
5. Cut out the green grass hand prints. Supervise the scissors.
6. Using the glue, stick the grass at the bottom of the blue sky. It can overlap.
7. Stick 2 or more bugs onto the end of lollipop sticks. To make puppets.
8. Stick the rest of the bugs and flowers onto the grass and sky.
9. Use a little glitter on the wet paint to add that special sparkle.
10. Display proudly, perhaps with a pot of lollipop flowers either side !

My big children have loved doing this again. They make much more detailed bugs now but still love the hand painting. It's a great activity to do if you have a mixture of younger and older children.
The only thing you may have to buy is paint. Everything else is lying around around at home. If you do buy paint, just get cheap and cheerful washable poster paint. Don't bother with black but white is very handy when you want to start mixing colours.
Top tip... if you add a dash of water and a tiny squirt of washing up liquid when you stir up the paint, it goes a lot further and is much more washable afterwards.
Do send me your pictures and comments. I'll try to get my head around the technology to make a gallery.
Happy painting ! Tune in again for another arty idea. Next time... dough bugs !
Hello to everyone who has logged on around the world...Germany, Taiwan, Britain and the States so far.
I hope you and your little ones are ready for something a little bit messier this week.
Paint !
Don't panic....it's not too messy but I would suggest having a bowl or sink full of warm water and a hand towel standing by before you start. I learnt this the hard way. Children nearly always wait to get truly painty until the point when we've got our hands full with their wet painting, their teddy that wants to see the painting and their brother or sister who tried to eat the painting. Have the hand washing water ready first, trust me. Actually, the more you can get ready in advance the better. It's so much easier to pop a few things together when they're asleep or watching cartoons. (You'll feel much more on top of things.)
Todays message...Messiness is good , but so is soap and water !
Here we go then. This week we are going to make a picture of a garden with nearly 3-d plants and bugs. Why not take the children for a walk in the park or around your garden first to look at the plants and bugs in real life. (Watch out for the ones that bite or sting !) Once again this is a cheapy creation. I have used children's paint which we already had at home but if you don't have any you could use pencils, crayons or scraps of coloured paper instead.

Here's what you will need....

One cardboard box, mine had cornflakes in it.
Pencil
Lollipop sticks
Supervised scissors
Children's glue
Washable paint, green, blue and any other spare colours. (Avoid black unless you supervise it carefully or pictures can be spoilt very easily.)
Paint brushes, large ends are better for this.
Optional glitter.
Here's how to do it....
1. Cut up the cereal box . You need the two large sides of the box to paint on and the remaining scraps for making flowers and bugs. The inside of cereal packets are great for kids paintings because they are stronger than paper when wet.

2. Paint one cardboard sheet blue for sky. All over. Leave to dry. (Use the inside surface not the printed side)
3. On the other sheet make green hand prints. This will be the grass. If your child is nervous of putting their hand into green gooey paint (and what sensible person wouldn't be) then they can paint their hand green with the brush to make the hand prints. Leave to dry.

4. On the left over scraps, paint bugs, beetles and flowers. Leave to dry, then cut out. (If a grown up curls the edges slightly before drying they will be more 3-dimensional.)
5. Cut out the green grass hand prints. Supervise the scissors.
6. Using the glue, stick the grass at the bottom of the blue sky. It can overlap.
7. Stick 2 or more bugs onto the end of lollipop sticks. To make puppets.
8. Stick the rest of the bugs and flowers onto the grass and sky.
9. Use a little glitter on the wet paint to add that special sparkle.
10. Display proudly, perhaps with a pot of lollipop flowers either side !

All done and well done !
The bug puppets can then pop in and out of the grass or flutter across the sky.
My big children have loved doing this again. They make much more detailed bugs now but still love the hand painting. It's a great activity to do if you have a mixture of younger and older children.
The only thing you may have to buy is paint. Everything else is lying around around at home. If you do buy paint, just get cheap and cheerful washable poster paint. Don't bother with black but white is very handy when you want to start mixing colours.
Top tip... if you add a dash of water and a tiny squirt of washing up liquid when you stir up the paint, it goes a lot further and is much more washable afterwards.
Do send me your pictures and comments. I'll try to get my head around the technology to make a gallery.
Happy painting ! Tune in again for another arty idea. Next time... dough bugs !
See you next week,
Heli x
Heli x
Subscribe to:
Posts (Atom)